Testing Guide
Summary
Running tests (quickstart guide)
To prepare to run tests from the command line, open a terminal and install Nox and uv:
python -m pip install uv nox nox-uv
py -m pip install uv nox nox-uv
To run tests, navigate to a directory within your local clone of PlasmaPy and run:
nox
This command will invoke pytest to run PlasmaPy’s tests.
Writing tests
All functionality in PlasmaPy must have tests.
Tests are located in the top-level
testsdirectory. For example, tests ofplasmapy.formularyare intests/formulary.The names of test files begin with
test_.Tests are either functions beginning with
test_or classes beginning withTest.Here is an example of a minimal
pytesttest that uses anassertstatement:def test_multiplication(): assert 2 * 3 == 6
Introduction
Software testing is vital for software reliability and maintainability. Software tests help us to:
Find and fix bugs.
Prevent old bugs from getting re-introduced.
Provide confidence that our code is behaving correctly.
Define what “correct behavior” actually is.
Speed up code development and refactoring.
Show future contributors examples of how code was intended to be used.
Confirm that our code works on different operating systems and with different versions of software dependencies.
Enable us to change code with confidence that we are not unknowingly introducing bugs elsewhere in our program.
Tip
Writing tests takes time, but debugging takes more time.
Every code contribution to PlasmaPy with new functionality must also have corresponding tests. Creating or updating a pull request will activate PlasmaPy’s test suite to be run via GitHub Actions, along with some additional checks. The results of the test suite are shown in the list of checks at the bottom of each pull request. Click on the name of each check to find out more details about test failures.
A unit test verifies a single unit of behavior, does it quickly, and does it in isolation from other tests [Khorikov, 2020]. A typical unit test is broken up into three parts: arrange, act, and assert [Osherove, 2013]. An integration test verifies that multiple software components work together as intended.
PlasmaPy’s tests are run using pytest and Nox. Tests are located in
the tests directory, which has subdirectories for each of the
subpackages. For example, tests of plasmapy.formulary
are located in tests/formulary and tests of
plasmapy.formulary.speeds are located in
tests/formulary/test_speeds.py.
Writing Tests
Every code contribution that adds new functionality requires both tests and documentation in order to be merged. Here we describe the process of write a test.
Locating tests
Tests are located in the top-level tests directory. The directory
structure of tests largely mirrors that of src/plasmapy, which
contains the source code of PlasmaPy.
The tests of a subpackage named plasmapy.subpackage are
located in the tests/subpackage/ directory. Tests for a module
named plasmapy.subpackage.module are generally located in
tests/subpackage/test_module.py. For example, tests for
plasmapy.formulary are located in tests/formulary, and tests
of plasmapy.formulary.speeds are located in
tests/formulary/test_speeds.py.
Test functions within each file have names that begin with test_
and end with a description of the behavior that is being tested. For
example, a test to checks that a Particle can be turned into an
antiparticle might be named :test_create_antiparticle_from_particle.
Because Particle is defined in
src/plasmapy/particles/particle_class.py, this test would be
located in tests/particles/test_particle_class.py.
Closely related tests may be grouped into classes. The name of a
test class begins with Test and the methods to be tested begin with
test_. For example, test_particle_class.py could define a
TestParticle class containing the method test_charge_number.
Example code contained within docstrings is tested to make sure that the actual printed output matches the output included in the docstring.
More information on test organization, naming, and collection is provided in pytest’s documentation on test discovery conventions.
Assertions
A software test runs a section of code and checks that a particular condition is met. If the condition is not met, then the test fails. Here is a minimal software test:
def test_addition():
    assert 2 + 2 == 4
The most common way to check that a condition is met is through an
assert statement, as in this example. If the expression that follows
assert evaluates to False, then this statement will raise an
AssertionError so that the test will fail. If the expression that
follows assert evaluates to True, then this statement will do
nothing and the test will pass.
When assert statements raise an AssertionError, pytest will
display the values of the expressions evaluated in the assert
statement. The automatic output from pytest is sufficient for simple
tests like above. For more complex tests, we can add a descriptive error
message to help us find the cause of a particular test failure.
def test_addition():
    actual = 2 + 2
    expected = 4
    assert actual == expected, f"2 + 2 returns {actual} instead of {expected}."
Tip
Use f-strings to improve error message readability.
Type hint annotations
PlasmaPy has begun using mypy to perform static type checking on
type hint annotations. Adding a -> None return annotation lets
mypy verify that tests do not have return statements.
def test_addition() -> None:
    assert 2 * 2 == 4
Floating point comparisons
Caution
Using == to compare floating point numbers can lead to brittle
tests because of slight differences due to limited precision,
rounding errors, and revisions to fundamental constants.
In order to avoid these difficulties, use
numpy.testing.assert_allclose when comparing floating point numbers
and arrays, and astropy.tests.helper.assert_quantity_allclose when
comparing Quantity instances. The rtol parameter for each of these
functions sets the acceptable relative tolerance. The value of rtol
should be set ∼1–2 orders of magnitude greater than the expected
relative uncertainty. For mathematical functions, a value of
rtol=1e-14 is often appropriate. For quantities that depend on
physical constants, a value between rtol=1e-8 and rtol=1e-5
may be required, depending on how much the accepted values for
fundamental constants are likely to change.
Testing warnings and exceptions
Robust testing frameworks should test that functions and methods return
the expected results, issue the expected warnings, and raise the
expected exceptions. pytest contains functionality to test warnings
and test exceptions.
To test that a function issues an appropriate warning, use
pytest.warns.
import warnings

import pytest


def issue_warning() -> None:
    warnings.warn("warning message", UserWarning)


def test_that_a_warning_is_issued() -> None:
    with pytest.warns(UserWarning):
        issue_warning()
To test that a function raises an appropriate exception, use
pytest.raises.
import pytest


def raise_exception() -> None:
    raise Exception


def test_that_an_exception_is_raised() -> None:
    with pytest.raises(Exception):
        raise_exception()
Test independence and parametrization
Sometimes we want to test how a function handles many different inputs. For example, take this simple function that checks if a number is less than 1000:
Let’s say we want to test both positive and negative numbers that are less than 1000. One way to use pytest would be to write sequential tests in a single function.
def test_less_than_1000() -> None:
    assert less_than_1000(999)
    assert less_than_1000(-1000)  # will only be run if the previous test passes
If the first test were to fail, then the subsequent test would never be run. We would therefore not know the potentially useful results of the second test. This drawback can be avoided by making independent tests so that both will be run.
def test_less_than_1000_positive_number() -> None:
    assert less_than_1000(999)


def test_less_than_1000_negative_number() -> None:
    assert less_than_1000(-1000)
However, this approach can lead to cumbersome, repeated code if you are
calling the same function over and over. To run multiple tests for the
same function, the preferred method is to decorate it with
@pytest.mark.parametrize.
@pytest.mark.parametrize("number_to_test", [999, -1000])
def test_less_than_1000(number_to_test: int) -> None:
    assert less_than_1000(number_to_test)
This code snippet will run less_than_1000(number_to_test) for each
number_to_test in [999, -1000]. Both of the above tests will
be run regardless of failures. This approach is much cleaner for long
lists of arguments, and has the advantage that you would only need to
change the function call in one place if the function changes.
With qualitatively different tests you would use either separate functions or pass in tuples containing inputs and expected values.
Test parametrization with argument unpacking
When the number of arguments passed to a function varies, we can use argument unpacking in conjunction with test parametrization.
Suppose we want to test a function called add that accepts two
positional arguments (a and b) and one optional keyword argument
(reverse_order).
Hint
This function uses type hint annotations to indicate that a and
b can be either a float or str, reverse_order should be
a bool, and add should return a float or str.
Argument unpacking lets us provide positional arguments in a tuple or
list (commonly referred to as args) and keyword arguments in a
dict (commonly referred to as kwargs). Unpacking occurs when
args is preceded by * and kwargs is preceded by **.
>>> args = ("1", "2")
>>> kwargs = {"reverse_order": True}
>>> add(*args, **kwargs)  # equivalent to add("1", "2", reverse_order=True)
'21'
We want to test add for three cases:
We can do this by parametrizing the test over args and kwargs,
and unpacking them inside of the test function.
@pytest.mark.parametrize(
    "args, kwargs, expected",
    [
        # test that add("1", "2", reverse_order=False) == "12"
        (["1", "2"], {"reverse_order": False}, "12"),
        # test that add("1", "2", reverse_order=True) == "21"
        (["1", "2"], {"reverse_order": True}, "21"),
        # test that add("1", "2") == "12"
        (["1", "2"], {}, "12"),  # if no keyword arguments, use an empty dict
    ],
)
def test_add(args: list[str], kwargs: dict[str, bool], expected: str) -> None:
    assert add(*args, **kwargs) == expected
Fixtures
Fixtures provide a way to set up well-defined states in order to have consistent tests. We recommend using fixtures whenever you need to test multiple properties (thus, using multiple test functions) for a series of related objects.
Property-based testing
Suppose a function \(f(x)\) has a property that \(f(x) > 0\) for
all \(x\). A property-based test would verify that f(x) — the
code implementation of \(f(x)\) — returns positive output for
multiple values of \(x\). The hypothesis package simplifies
property-based testing for Python.
Best practices
The following list contains suggested practices for testing scientific software and making tests easier to run and maintain. ✅ These guidelines are not rigid, and should be treated as general principles should be balanced with each other rather than absolute principles.
Run tests frequently for continual feedback. If we edit a single section of code and discover a new test failure, then we know that the problem is related to that section of code. If we edit numerous sections of code before running tests, then we will have a much harder time isolating the section of code causing problems.
Turn bugs into test cases [Wilson et al., 2014]. It is said that “every every bug exists because of a missing test” [Bernstein, 2015]. After finding a bug, write a minimal failing test that reproduces that bug. Then fix the bug to get the test to pass. Keeping the new test in the test suite will prevent the same bug from being introduced again. Because bugs tend to be clustered around each other, consider adding tests related to the functionality affected by the bug.
Make tests fast. Tests are most valuable when they provide immediate feedback. A test suite that takes a long time to run increases the probability that we will lose track of what we are doing and slows down progress.
Tip
Decorate tests with
@pytest.mark.slowif they take \(≳ 0.3\) seconds.@pytest.mark.slow def test_calculate_all_primes() -> None: calculate_all_primes()
Write tests that are easy to understand and change. To fully understand a test failure or modify existing functionality, a contributor will need to understand both the code being tested and the code that is doing the testing. Test code that is difficult to understand makes it harder to fix bugs, especially if the error message is missing or hard to understand, or if the bug is in the test itself. When test code is difficult to change, it is harder to change the corresponding production code. Test code should therefore be kept as high quality as production code.
Write code that is easy to test. Write short functions that do exactly one thing with no side effects. Break up long functions into multiple functions that are smaller and more focused. Use pure functions rather than functions that change the underlying state of the system or depend on non-local variables. Use test-driven development and write tests before writing the code to be tested. When a section of code is difficult to test, consider refactoring it to make it easier to test.
Separate easy-to-test code from hard-to-test code. Some functionality is inherently hard to test, such as graphical user interfaces. Often the hard-to-test behavior depends on particular functionality that is easy to test, such as function calls that return a well-determined value. Separating the hard-to-test code from the easy-to-test code maximizes the amount of code that can be tested thoroughly and isolates the code that must be tested manually. This strategy is known as the Humble Object pattern.
Make tests independent of each other. Tests that are coupled with each other lead to several potential problems. Side effects from one test could prevent another test from failing, and tests lose their ability to run in parallel. Tests can become coupled when the same mutable
objectis used in multiple tests. Keeping tests independent allows us to avoid these problems.Make tests deterministic. When a test fails intermittently, it is hard to tell when it has actually been fixed. When a test is deterministic, we will always be able to tell if it is passing or failing. If a test depends on random numbers, use the same random seed for each automated test run.
Tip
Tests that fail intermittently can be decorated with the
@pytest.mark.flakydecorator from pytest-rerunfailures to indicate that the test should be rerun in case of failures:@pytest.mark.flaky(reruns=5) # see issue 1548 def test_optical_density_histogram(): ...
Each usage of this decorator should have a comment that either indicates why the test occasionally fails (for example, if the test must download data from an external source) or refers to an issue describing the intermittent failures.
Avoid testing implementation details. Fine-grained tests help us find and fix bugs. However, tests that are too fine-grained become brittle and lose resistance to refactoring. Avoid testing implementation details that are likely to be changed in future refactorings.
Avoid complex logic in tests. When the arrange or act sections of a test include conditional blocks, most likely the test is verifying more than one unit of behavior and should be split into multiple smaller tests.
Test a single unit of behavior in each unit test. This suggestion often implies that there should be a single assertion per unit test. However, multiple related assertions are appropriate when needed to verify a particular unit of behavior. However, having multiple assertions in a test often indicates that the test should be split up into multiple smaller and more focused tests.
If the act phase of a unit test is more than a single line of code, consider revising the functionality being tested so that it can be called in a single line of code [Khorikov, 2020].
Running tests
PlasmaPy’s tests can be run in the following ways:
Creating and updating a pull request on GitHub
Running
pytestfrom the command lineRunning Nox from the command line
Running tests from an IDE such as PyCharm or Visual Studio.
We recommend that new contributors perform tests via a pull request on GitHub. Creating a draft pull request early and keeping it updated ensures that all necessary checks are run frequently.
To run tests locally via the command line, we recommend using Nox to ensure that tests are run in the same environment as in CI.
Using GitHub
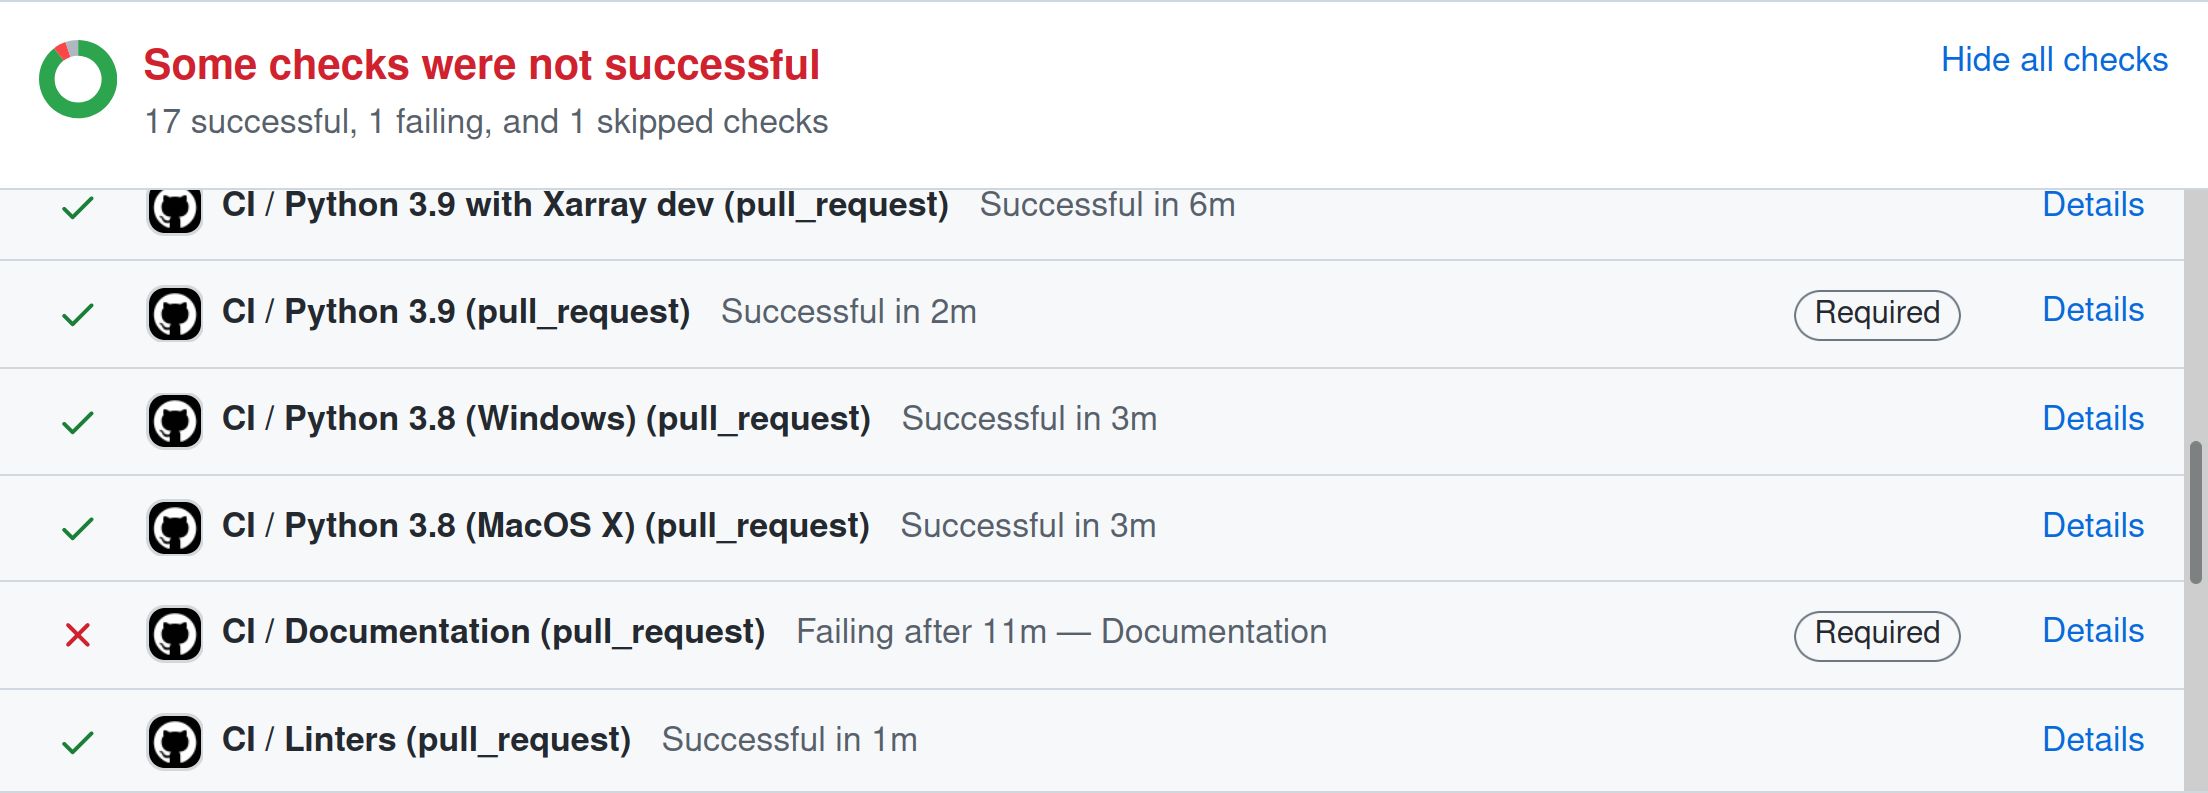
The recommended way for new contributors to run PlasmaPy’s full test suite is to create a pull request from your development branch to PlasmaPy’s GitHub repository. The test suite will be run automatically when the pull request is created and every time changes are pushed to the development branch on GitHub. Most of these checks have been automated using GitHub Actions.
The following image shows how the results of the checks will appear in each pull request near the end of the Conversation tab. Checks that pass are marked with ✔️, while tests that fail are marked with ❌. Click on the name of each check for more information about why a particular check failed.
Checks run on every pull request
The following is an incomplete list of checks performed for every pull
request. These checks change frequently, so the names may be slightly
different. These checks are defined in .github/workflows/ci.yml,
and usually invoke Nox sessions defined in noxfile.py.
Checks with labels beginning with CI / Tests, Python 3.x verify that PlasmaPy’s test suite passes when run using different versions of Python or on different operating systems. These tests are set up using Nox and run with
pytestvia GitHub Actions.Tip
To take advantage of recent improvements in error messages, start by checking test failures for the newest version of Python.
The CI / Documentation check verifies that PlasmaPy’s documentation is able to build correctly from the pull request. Warnings are treated as errors.
The docs/readthedocs.org:plasmapy check allows us to preview how the documentation will appear if the pull request is merged.
Tip
Click on **docs/readthedocs.org:plasmapy** in the list of checks to access a preview of the documentation.
The Changelog check verifies whether a changelog entry with the correct number is present in the
changelogdirectory (unless the pull request has been labeled with no changelog entry needed or skip changelog checks).Tip
The Changelog Guide describes the process for adding a changelog entry to a pull request.
The pre-commit.ci check runs linters, autoformatters, and other quality assurance tools via pre-commit. PlasmaPy’s pre-commit troubleshooting guide describes how to deal with common pre-commit failures.
Important
Auto-fixes from pre-commit can be applied by writing a comment that says
pre-commit.ci autofixto the Conversation tab on a pull request. Remember togit pullafterwards!The codecov/patch and codecov/project checks generate test coverage reports that show which lines of code are run by the test suite and which are not (see also the section on Code coverage.). Codecov will automatically post its report as a comment to the pull request. The Codecov checks will be marked as passing when the test coverage is satisfactorily high.
The CI / Packaging check verifies that no errors arise that would prevent an official release of PlasmaPy from being made.
The CI / Static type checking with mypy check performs static type checking of type hint annotations with mypy.
Note
For first-time contributors, a maintainer may need to manually enable your GitHub Action test runs.
Using pytest
To install the packages necessary to run tests on your local computer (including Nox and pytest), run:
pip install -e .[tests]
To run PlasmaPy’s tests from the command line, go to a directory within PlasmaPy’s repository and run:
pytest
This command will run all of the tests found within your current
directory and all of its subdirectories. Because it takes time to run
PlasmaPy’s tests, it is usually most convenient to specify that only a
subset of the tests be run. To run the tests contained within a
particular file or directory, include its name after pytest.
pytest tests/particles/test_atomic.py
Tip
The pytest-filter-subpackage extension lets us use the -P
flag to specify a subpackage (directory) that tests should be run
for. To perform tests for plasmapy.particles, run:
pytest -P particles
The documentation for pytest describes how to invoke pytest and
specify which tests will or will not be run. A few useful examples of
flags you can use with pytest are:
Use the
--tb=shortto shorten traceback reports, which is useful when there are multiple related errors. Use--tb=longfor traceback reports with extra detail.Use the
-xflag to stop the tests after the first failure. To stop after \(n\) failures, use--maxfail=nwherenis replaced with a positive integer.Use the
-m 'not slow'flag to skip running slow (defined by the@pytest.mark.slowmarker) tests, which is useful when the slow tests are unrelated to your changes. To exclusively run slow tests, use-m slow.Use the
--pdbflag to enter the Python debugger upon test failures.
Using Nox
PlasmaPy’s continuous integration checks on GitHub are typically run
using Nox, a versatile Python tool for automating tasks such as
running software tests, building documentation, running code quality
checks, and performing other development tasks. Nox sessions are
defined via functions decorated with @nox.session in
noxfile.py.
Using Nox simplifies testing PlasmaPy with different releases of
Python, with different versions of PlasmaPy’s dependencies, and on
different operating systems. Testing with Nox is more robust than
testing with pytest alone because Nox creates its own virtual
environments and ensures that tests are run locally the same way as in
CI.
To run PlasmaPy’s tests (except for those marked as slow), enter the top-level directory of the repository and run:
nox
To find out what Nox sessions are defined, run:
nox -l
To run PlasmaPy’s tests for a particular session, run:
nox -s '<session>'
where <session> is replaced with the name of the Nox session. The
quotes are only needed if <session> contains special characters like
parentheses.
For example, static type checking with mypy can be run locally with
nox -s mypy
Commands using Nox must be run in the top-level directory of the
PlasmaPy repository, which is the directory containing
noxfile.py.
Tip
Installing uv alongside Nox leads to significantly faster dependency resolution and improved caching.
Code coverage
Code coverage refers to a metric “used to describe the degree to which the source code of a program is executed when a particular test suite runs.” The most common code coverage metric is line coverage:
Line coverage reports show which lines of code have been used in a test and which have not. These reports show which lines of code remain to be tested, and sometimes indicate sections of code that are unreachable.
PlasmaPy uses coverage.py and the pytest-cov plugin for pytest to
measure code coverage and Codecov to provide reports on GitHub.
Tip
Use test coverage reports to write tests that target untested sections of code and to find unreachable sections of code.
Caution
While a low value of line coverage indicates that the code is not adequately tested, a high value does not necessarily indicate that the testing is sufficient. A test that makes no assertions has little value, but could still have high test coverage.
Generating coverage reports with pytest
Code coverage reports may be generated on your local computer to show
which lines of code are covered by tests and which are not. To generate
an HTML report, use the --cov flag for pytest:
pytest --cov
coverage html
Open htmlcov/index.html in your web browser to view the coverage
reports.
Excluding lines in coverage reports
Occasionally there will be certain lines that should not be tested. For
example, it would be impractical to create a new testing environment to
check that an ImportError is raised when attempting to import a
missing package. There are also situations that coverage tools are not
yet able to handle correctly.
To exclude a line from a coverage report, end it with
# coverage: ignore. Alternatively, we may add a line to
exclude_lines in the [tool.coverage.report] section of
pyproject.toml that consists of a
a pattern that indicates that a line be excluded from coverage reports.
In general, untested lines of code should remain marked as untested to
give future developers a better idea of where tests should be added in
the future and where potential bugs may exist.
Coverage configurations
Configurations for coverage tests are given in the
[tool.coverage.report] and [tool.coverage.run] sections
of pyproject.toml. Codecov configurations are given in
codecov.yml.
Using an integrated development environment
An IDE typically has built-in tools that simplify software testing. IDEs like PyCharm and Visual Studio allow test configurations to be run with a click of the mouse or a few keystrokes. While IDEs require time to learn, they are among the most efficient methods to interactively perform tests. Here are instructions for running tests in several popular IDEs: